(Current) OSCAR EMR 15 Installation
- Raymond Rusk
- Jason Gallagher
- Chris Owens
Table of Contents
Table of Contents
1 OSCAR 15 Ubuntu installation
1.1 Manual Installation of OSCAR Components
1.1.1 Prerequisites
1.1.2 Update the System
1.1.3 Installing the Infrastructure Packages
1.1.4 Getting the OSCAR Code (WAR File)
1.1.5 Create the OSCAR Database
1.1.6 Setting Up OSCAR Properties
1.1.7 Importing Drugref 2
1.1.8 Finalizing the Installation
1.2 Installation of OSCAR from DEB Files
1.3 Installation of an OSCAR Patch
_Toc527107951 1OSCAR 15 Ubuntu installation
1.1Manual Installation of OSCAR Components
1.1.1Prerequisites
- For new installations, Ubuntu 16.04.3 LTS (the Long Term Support version) or later is recommended. Whole disk encryption as a prequel for future security hardening is recommended. For existing installs, it is acceptable to use other supported LTS versions of Ubuntu.
- The host computer should be dedicated to OSCAR and have access restricted to trusted users.
- Always use secure passwords/encryption keys/passphrases that contain at least 8 characters including a mixture of at least 3 of the following: upper case letters, lower case letters, digits and symbols. This also applies to keystore passwords used for Tomcat SSL/TLS configuration, for instance. Also, never leave any default passwords (on gateway routers, etc.) unchanged that may impact the security of your Oscar installation.
1.1.2Update the System
Install system updates and restart server.
sudo apt-get update
sudo apt-get upgrade
shutdown –r now
1.1.3Installing the Infrastructure Packages
1.1.3.1 Java 8
OSCAR is written in the Java programming language and works best with Oracle Java 8. Follow the instructions here to download and install the Oracle Java 8 Runtime Environment with the Java Cryptography Extension (JCE) Unlimited Strength Jurisdiction Policy Files:
sudo add-apt-repository ppa:webupd8team/java
sudo apt-get update
sudo apt-get install oracle-java8-installer
sudo apt-get install oracle-java8-unlimited-jce-policy
1.1.3.2 Tomcat 7
To support OSCAR's web based user interface, the system leverages the extensive resources of the Apache Tomcat web application framework. Install Tomcat using:
sudo apt-get install tomcat7 libtomcat7-java
At this point, tomcat7 may fail to start because the environment variable JAVA_HOME is undefined. Also, to run Oscar successfully, the tomcat7 configuration must be modified. Tomcat will need to use more memory then the default allocation allows. Open the Tomcat settings file (/usr/default/tomcat7) using your text editor. You can use whichever editor you choose. In these instructions, we will use nano:
sudo nano /etc/default/tomcat7
Add the following two lines to the end of the file.
JAVA_HOME="/usr/lib/jvm/java-8-oracle"
JAVA_OPTS="-Djava.awt.headless=true -Xmx1024m -Xms256m -XX:MaxPermSize=512m -XX:+UseConcMarkSweepGC -XX:+CMSIncrementalMode -server"
Save the file and exit nano Save changes with ctrl+o – hit enter to confirm changes – using ctrl+x exit "nano" environment..
Optionally, include within JAVA_OPTS above the parameter "Djava.security.egd=file:/dev/./urandom" to speed startup and to ensure that Tomcat doesn't block. For an explanation of how this option works, see http://www.thezonemanager.com/2015/07/whats-so-special-about-devurandom.html. Note: Be very careful with Tomcat configuration file changes. Test Tomcat by using Stop and Start to ensure changes do not cause Tomcat starting issues.
If the installation of tomcat7 failed to complete because JAVA_HOME was undefined, complete the installation process with:
sudo apt-get upgrade
Respond yes when asked whether you want to use the previous configuration. That configuration is in /etc/default/tomcat7 which you have just edited to include JAVA_HOME.
It should now be possible to restart Tomcat (without errors) using this command:
sudo service tomcat7 restart
A few other environment variables are useful when working with OSCAR. One way to make these environment variables available system-wide is by adding them to /etc/profile.
sudo nano /etc/profile
If you are configuring OSCAR on a freshly installed Ubuntu server, then you should be safe to add these lines to the end of the file.
JAVA_HOME="/usr/lib/jvm/java-8-oracle"
CATALINA_HOME="/usr/share/tomcat7"
CATALINA_BASE="/var/lib/tomcat7"
export JAVA_HOME CATALINA_HOME CATALINA_BASE
Save and exit nano. To load the new environment variables into your existing terminal, run the following command. Please note that the sudo command should not be used here. (Warning: An error in /etc/profile could prevent login. Be very careful when editing this file. After /etc/profile has been edited and before logging out, it is good practice to confirm that login is still possible.)
source /etc/profile
Tomcat should now be security hardened to use SSL connections. We will illustrate the process using a self-signed certificate but a production system should use certificates issued by a trusted certificate authority. An SSL certificate for tomcat can be generated using:
sudo $JAVA_HOME/bin/keytool -genkey -alias tomcat -validity 3650 -keyalg RSA -keystore /etc/tomcat7/.keystore -keypass changeit -storepass changeit
Note that "changeit" must be replaced with a strong password. Then the following code needs to be added to $CATALINA_BASE/conf/server.xml where the password used for keystorePass has to be the strong password used to create the ssl certificate:
<Connector port="8443"
maxHttpHeaderSize="8192"
protocol="org.apache.coyote.http11.Http11Protocol"
SSLEnabled="true"
maxThreads="150"
minSpareThreads="25"
maxSpareThreads="75"
acceptCount="100"
scheme="https"
secure="true"
enableLookups="false"
disableUploadTimeout="true"
clientAuth="false"
keystoreFile="/etc/tomcat7/.keystore"
keystorePass="changeit"
sslProtocol="TLS"
ciphers="TLS_ECDHE_RSA_WITH_AES_128_CBC_SHA256, TLS_ECDHE_RSA_WITH_AES_128_CBC_SHA,TLS_ECDHE_RSA_WITH_AES_256_CBC_SHA384, TLS_ECDHE_RSA_WITH_AES_256_CBC_SHA,TLS_ECDHE_RSA_WITH_RC4_128_SHA, TLS_RSA_WITH_AES_128_CBC_SHA256,TLS_RSA_WITH_AES_128_CBC_SHA,TLS_RSA_WITH_AES_256_CBC_SHA256, TLS_RSA_WITH_AES_256_CBC_SHA,SSL_RSA_WITH_RC4_128_SHA" />
You should also modify the Connector on port 8080 so that it only accepts connections from localhost. Drugref2, which we install later, runs in the same Tomcat instance as OSCAR and communicates with OSCAR via port 8080. However, this modification prevents external access to OSCAR. The Connector configuration will look like this:
<Connector port="8080" enableLookups="false" protocol="HTTP/1.1"
address="127.0.0.1"
connectionTimeout="20000"
URIEncoding="UTF-8"
redirectPort="8443" />
By default $CATALINA_BASE/conf/server.xml is world readable. Since it now contains the keystore password, change permissions to prevent it being read by non-privileged users:
sudo chmod 640 server.xml
Now restart tomcat7 and verify that it is running on port 8443. If you are using a self-signed certificate, curl will complain about the certificate. You can use 'curl –insecure' for testing.
sudo service tomcat7 restart
*curl --insecure https://localhost:8443/*
1.1.3.3 MariaDB 10.0.x
Your specific CMS data, profiles, and information will all be stored in the MariaDB database. (Ubuntu 16.04.x LTS no longer supports MySQL 5.5. MariaDB 10.0.x is an open-source binary-compatible fork of MySQL that is supported by Ubuntu 16.04.x LTS. OSCAR 15 can use MariaDB 10 without code changes.) Read the instructions presented by the database installation script. Accept the suggested defaults. There will be no current password if this is a new installation.
sudo apt-get install mariadb-server mariadb-client libmysql-java
sudo mysql_secure_installation
The installation sequence will ask you to set a root password. Enter it. You will be prompted to enter the password again to verify.
Remember: this password as you will need it again later in the installation whenever ****** is referenced. If you use symbols "#,!, &,*, (, ), / , \ and $" in this password (e.g. pass&word), be sure to escape them when replacing the ****** (e.g. pass\&word). |
By default, Linux root credentials are required to log into the MariaDB server. OSCAR will need to login without Linux root credentials. Bypass the plugin requiring root credentials:
$ sudo mysql -uroot –p
MariaDB [(none)]> use mysql;
MariaDB [mysql]> update user set plugin='' where User='root';
MariaDB [mysql]> flush privileges;
MariaDB [mysql]> quit
$ mysql –uroot –p
MariaDB [(none)]> quit
By default, new databases created in MariaDB will use the UTF8MB4 character set whereas new databases created in MySQL 5.5 use latin1, if the character set is left unspecified.
1.1.3.4 wkhtmltopdf
The package wkhtmltopdf is used to print some pdf content. It can be installed using:
sudo apt-get install wkhtmltopdf
sudo apt-get install xvfb
echo -e '#!/bin/bash\nxvfb-run -a --server-args="-screen 0, 1024x768x24" /usr/bin/wkhtmltopdf -q $' > /tmp/wkhtmltopdf.sh*
chmod a+x /tmp/wkhtmltopdf.sh
sudo mv /tmp/wkhtmltopdf.sh /usr/bin/
sudo ln -s /usr/bin/wkhtmltopdf.sh /usr/local/bin/wkhtmltopdf
After refreshing your path, you can test wkhtmltopdf with:
wkhtmltopdf -s Letter -T 10mm -L 8mm -R 8mm http://oscarmanual.org test.pdf
1.1.4Getting the OSCAR Code (WAR File)
We will now download the binary WAR file from Jenkins and move it to $CATALINA_BASE (which you set to /var/lib/tomcat7 earlier in this manual).
Please get the latest recommended Oscar release and build number from Oscar EMR. The most recent OSCAR software builds are available at http://jenkins.oscar-emr.com:8080/job/oscar-stable/. Older builds are archived in Dropbox and can be found following links provided at https://oscaremr.atlassian.net/wiki/spaces/OS/pages/86938572/OSCAR+Builds.
The most recent successfully built (but likely not QA tested) WAR file is at:
http://jenkins.oscar-emr.com:8080/job/oscar-stable/lastSuccessfulBuild/artifact/target/
(The database matching this war is at http://jenkins.oscar-emr.com:8080/job/oscar-stable/lastSuccessfulBuild/artifact/database/. Note that both war and database can be downloaded in a single zip file from http://jenkins.oscar-emr.com:8080/job/oscar-stable/lastSuccessfulBuild/artifact/ )
Click the "oscar-14.0.0-SNAPSHOT.war" link in your browser to download the WAR file. By default Firefox will download the files to the "Downloads" directory under your Home directory. You can change the file name but always keep the ".war" extension. In this example, you must change the file name to "oscar.war" for the rest of the instructions to work. From the Downloads directory
cd ~/Downloads
mv oscar-14.0.0-SNAPSHOT.war oscar.war
You now need to copy the WAR file to $CATALINA_BASE/webapps/ on the Oscar server. You may need to reset the access rights of the file using the "chmod" command; this is to ensure there is no access right issue. Run the following commands, assuming you are in a directory to where the war file has been copied on your server:
sudo cp oscar.war $CATALINA_BASE/webapps/
sudo chown tomcat7:tomcat7 $CATALINA_BASE/webapps/oscar.war
sudo chmod 644 $CATALINA_BASE/webapps/oscar.war
There will be disk activity as Tomcat unpacks the war and it will take time. You should see an oscar/ directory created in your $CATALINA_BASE/webapps/ directory.
Now you have the OSCAR code in your computer, but code needs data to work on. If you examine the tomcat7 log in /var/log/tomcat7/catalina.out, you will see that OSCAR will have failed to locate the database. In the next section you will create and set up the OSCAR database on your computer.
1.1.5Create the OSCAR Database
First, go to Jenkins or Dropbox to download the latest database scripts related to the build. As noted above, the database will be archived together with the war downloaded above. Pick the database matching the release and build number of the build that you plan to install.
Copy the zip file to the server home directory. Unzip and make the scripts executable:
unzip database.zip
cd database
chmod 755 mysql/.sh*
OSCAR includes scripts to create and populate the MariaDB database. (The database name used here is oscar_15 but that can be changed). Current versions of stable will specify the UTF8 character set while creating the OSCAR database. That is necessary because some of OSCAR's indexes become too large using MariaDB's default UTF8BM4 character set.
Only run one of the following two database creation commands (either A or B) | A) Users that wish to use Ontario's billing subsystem |
OSCAR users that are from neither Ontario nor BC can run either of the above commands (you must run one of them; we use the Ontario one in this example). If you ever need to reinitialize the database, you can use the same script.
Note that while the database creation script runs, any user with shell access to the host can see the password entered above using the 'ps' command. Also, running this command leaves the password in the bash history file of the account used to create the database. To prevent any possibility that this entry in the history file can be viewed by a non-trusted user, delete it from the history using 'history -d nnnn' with nnnn replaced by the number displayed before the createdatabase_xx.sh … entry in the history listing.
If you have already setup an oscar database before and need to update it, you can find all the update scripts in the mysql/updates/ subdirectory.
1.1.6Setting Up OSCAR Properties
You will need an oscar.properties file in your $CATALINA_HOME directory. (Note that if you renamed the Oscar war file to something different than oscar.war then the properties file will also be named differently. For instance, if the war is named oscar15.war then the properties file should be named oscar15.properties.) The oscar.properties file must be readable by tomcat7. It should not be world-readable as it will contain the OSCAR database password.
You can find a sample of the properties file at:
$CATALINA_BASE/webapps/oscar/WEB-INF/classes/oscar_mcmaster.properties
To copy the sample properties files to $CATALINA_HOME directory:
*sudo cp $CATALINA_BASE/webapps/oscar/WEB-INF/* classes/oscar_mcmaster.properties $CATALINA_HOME/oscar.properties
sudo chown tomcat7:tomcat7 $CATALINA_HOME/oscar.properties
sudo chmod 640 $CATALINA_HOME/oscar.properties
Once you copy the file to the $CATALINA_HOME directory, you can edit the file with any editor you want. We're still using nano:
sudo nano $CATALINA_HOME/oscar.properties
Uncomment and set the database name. If you database name is different from oscar_15, modify this line so that it matches your database name.
db_name = oscar_15?zeroDateTimeBehavior=round&useOldAliasMetadataBehavior=true&jdbcCompliantTruncation=false
Change the db_password to match the MariaDB database password that you set earlier
Warning: do not put any blank spaces at the end of any line! | db_password=******* |
Set the default prefix for phone numbers in your area to save the reception keystrokes (TIP this is not limited to an area code e.g. "905-6" might be efficient)
phoneprefix=905-
Set the default billing center; note the bill center codes are listed in the properties file
billcenter=D
BC users will probably want to adjust the following to match their environment
visitlocation = P1|PEMBERTON
dataCenterId = 00000
msp_error_codes = # supply the file location of msp error codes
billregion=BC
NEW_BC_TELEPLAN=yes
CDM_ALERTS=250,428,4280
COUNSELING_CODES=18220,18120,17220,17120,16220,16120,13220,12220,12120,00120
It is recommended that the following configuration parameters be added to the oscar.properties file if they are not already there. HL7TEXT_LABS=yes allows you to display labs and SINGLE_PAGE_CHART=true enables access to the new UI from the appointment menu. To allow import and export of patient charts, the TMP_DIR directory should be set to a secure temporary document directory (the example below uses /usr/share/oscar-emr/tmp) owned by tomcat7, belonging to the tomcat7 group, with rights to the directory restricted (chown tomcat7:tomcat7 and chmod 750 on directory).
HL7TEXT_LABS=yes
SINGLE_PAGE_CHART=true
TMP_DIR=/usr/share/oscar-emr/tmp
It is not necessary to define the ModuleNames parameter unless you are using a specific module outside of standard OSCAR functionality. Only the last ModuleNames parameter in the Oscar properties file is used so if you need to use more than one module, they must be listed together separated by commas.
ModuleNames=FAX,Jobs,BORN
Save oscar.properties file and exit your editor. You are almost done!
1.1.7Importing Drugref 2
The drug database is actually a small separate server – not part of OSCAR proper. It gets its data from Health Canada's drug database, and you can update your Drugref database whenever you want from within OSCAR. But in order to use that data, you'll first need to create a local "Drugref" database on your server and import data into it.
You can get the Drugref WAR file from Jenkins:
http://jenkins.oscar-emr.com:8080/job/drugref2/lastSuccessfulBuild/
First, move the Drugref WAR file from the download directory to $CATALINA_BASE and edit the drugref2.properties file to let Tomcat have access to the Drugref database:
mv drugref2-1.0-SNAPSHOT.war drugref2.war
sudo mv drugref2.war $CATALINA_BASE/webapps
sudo chown tomcat7:tomcat7 $CATALINA_BASE/webapps/drugref2.war
sudo chmod 644 $CATALINA_BASE/webapps/drugref2.war
Launch your text editor to create drugref2.properties:
sudo nano $CATALINA_HOME/drugref2.properties
Enter the following lines into drugref2.properties. Replace ****** with the MariaDB password you set earlier.
db_user=root
db_password={}******
db_url=jdbc:mysql://127.0.0.1:3306/drugref
db_driver=com.mysql.jdbc.Driver
Make sure that the drugref2.properties file is owned by tomcat7, belongs to the tomcat7 group and is not world readable as it contains the root password for the database (chown 640).
In your oscar.properties, add the following line (or change it if the property already exists):
*drugref_url = http://localhost:8080/drugref2/DrugrefService*
Note: If you decide to put your Drugref service in a separate server, change localhost:8080 to your corresponding host address : port number.
Create a new database with UTF8 character set for Drugref. You will be prompted for the root MariaDB password you set earlier:
mysql -uroot -p -e "CREATE DATABASE drugref CHARACTER SET UTF8 COLLATE UTF8_GENERAL_CI;"
Restart tomcat so OSCAR and Drugref2 reload their properties.
sudo service tomcat7 restart
Your Drugref database is still empty. To populate it with the latest data, run the following command on the server:
*$ curl http://localhost:8080/drugref2/Update.jsp*
The data loading process does not provide any screen to show progress but is simply kept in a refresh state. The update takes less than an hour to complete. If you want to monitor progress, you can issue this command in a separate terminal session:
sudo tail –f /var/log/tomcat7/catalina.out
If you have a desktop environment installed on the server and have loaded *http://localhost:8080/drugref2/Update.jsp* using a web browser, you can leave the browser open and wait for the complete page to show, or you can close the browser – the server will continue updating the Drugref database until finished. When the update is finished, a screen similar to the one below will be shown on the browser page.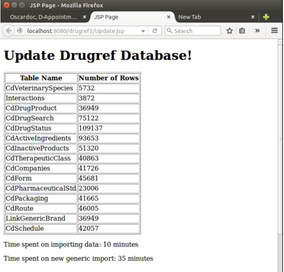
The Drugref database should be updated periodically. It can be updated from within OSCAR by the administrative user clicking on the Administration tab, selecting Integration and then "Update Drugref", or it can be updated in the same way it was initialized. Before updating an existing Drugref database, it is recommended that that existing Drugref database be backed up so that it can be restored should the attempt to update Drugref fail. (While updating, the existing Drugref database table content is dropped. Should the update fail, the Drugref database will be empty or incomplete.)
1.1.8Finalizing the Installation
Tomcat needs to be restarted to make the configuration changes take effect.
sudo service tomcat7 restart![]() (When restarting tomcat7, you may wish to monitor /var/log/tomcat7/catalina.out for error messages during server startup.) Assuming that tomcat7 starts up Oscar successfully, the installation process is done. You can open your browser (we use Firefox) and log into your OSCAR EMR.
(When restarting tomcat7, you may wish to monitor /var/log/tomcat7/catalina.out for error messages during server startup.) Assuming that tomcat7 starts up Oscar successfully, the installation process is done. You can open your browser (we use Firefox) and log into your OSCAR EMR.
|
|
1.2Installation of OSCAR from DEB Files
For users in Ontario that prefer a more integrated installation without managing the different components in OSCAR, installation from DEB packages contributed by community members is possible. The OSCAR 15 DEB files are available at {+}http://sourceforge.net/projects/oscarmcmaster/files/Oscar%20Debian%2BUbuntu%20deb%20Package/+
The installation instructions for the community supported OSCAR15 debian package are located at http://oscarmanual.org/15/developers/installation/reference
1.3Installation of an OSCAR Patch
To deploy a newer WAR file (OSCAR EMR released patch) on an existing system one should follow any directions that come with the patch. The following is a general set of steps to update a deployed OSCAR application patch.
Any OSCAR patch should be first deployed in a test environment to identify the impact on the clinic being upgraded. Each practice has a unique set of data and in many situations the patch could impact the existing clinic workflow or functionality. Upgrading in a development environment with the latest data from production allows the end users to verify, accept and sign-off the change(s) before implementing the patch in production.
Once users approved the patch upgrade and before deployment of the patch to production, it is a mandatory requirement to back up existing database configuration files and folders in the production system first.
Steps for updating the WAR file.
sudo service tomcat7 stop (stop tomcat)
sudo rm $CATALINA_BASE/webapps/oscar.war
sudo rm -rf $CATALINA_BASE/webapps/oscar
sudo rm -rf $CATALINA_BASE/work/Catalina/localhost/oscar
sudo cp <war file> $CATALINA_BASE/webapps/oscar.war
sudo chown tomcat7:tomcat7 $CATALINA_BASE/webapps/oscar.war
sudo chmod 644 $CATALINA_BASE/webapps/oscar.war
sudo service tomcat7 start
Step for applying a DB patch file. You will be prompted for the MariaDB password associated with <username>. <username> is the MariaDB root account if the previous steps were followed.
mysql -u <username> -p <db_name> < /path/to/file.sql